January 30, 2009

Desktop Calendar

I know its already the end of January but I really didnt get the chance to create this any sooner BUT then again there are still 11 months still to use it lol!!


DSC_0009


Requirements –

  • Sheet of chipboard 15cm by 30cm
  • Patterned paper
  • Embellishments
  • Printout of templates

Directions –


Tear two strips of patterned paper and adhere them to each side of a piece of patterned paper cut to 8cm by 30cm.


DSC_0001


Cut the strip of chipboard into the following sized rectangles – Two pieces of 15cm by 10cm andTwo pieces of 15cm by 5cm

DSC_0002


Lay the chipboard pieces on the back of the piece of patterned paper you just created in the following order; 10cm by 15cm, 10cm by 15cm, 5cm by 15cm and 5cm by 15cm. Remember to leave a small gap of approximately 2mm between each piece and adhere to chipboard. Sand all edges to neaten but the bottom edge where there is an overhang as this will be used to complete the spine.


DSC_0003


Repeat on the reverse with another piece of patterned paper to cover the inside of the spine. Score along each of the gaps you created between each of the chipboard pieces and gently fold into position. Glue the flap you left earlier to the other edges to secure both edges together. Adjust each of the folded edges until the cover spine sits flat.


DSC_0004


Print out each of the templates below, simply save each JPeg to your computer and print at an A4 size.


2009 calendar template


Dates template


Cut each into sections, arrange in order and staple together to create 2 mini books.


DSC_0006

January 23, 2009

Technique Talk

I'd like to share a couple of different techniques I used on this layout. Of course you could use just one of these examples to suit your designs.

1. Combining Stamping & Stitching. This technique came about quite by accident. I chose to stamp directly on my layout, however I didn't put enough pressure in my stamping. This resulted in a 'soft' image in places. I then chose to 'fill in' my image with hand stitching in the same colour as the image, with similar flourish designs.


2. Texture Paste Flowers. I had seen this technique in a magazine some time ago and decided to try for myself. By placing a small quantity of texture paste in the corner of a small plastic bag I was now ready to begin my designs. Chose the colour of netting to suit your design and lay this piece over some greaseproof paper. (This will prevent your work surface getting marked with the paste that may dribble through the netting holes). Cut a very small piece from the tip of your plastic bag. To control your flow of paste, wrap the top of the bag around your finger and squeeze a flower design directly onto your netting. Leave to dry thoroughly before cutting around your pasted flower. Place on your layout with paper flowers and brads.

I hope these quick and easy techniques give you some thought to try something new if only by accident.

Till next time
Happy Scrapping

Penny

January Club Scrapp-it Now

I love getting the kits every month from Scrappit, finding a whole package of goodies that I can play with but didnt need to choose and match for myself. I originally began working with kits because of the time saving it provided for me but I soon learnt that each kit could also be seen as a personal challenge - what will I do with these papers? I love that challenge more than anything, it keeps me interested and excited by this awesome hobby!!
Anyway, here are some of the pages that I created using this months kit -

Another of the photo's taken at the Royal show in 2008 - seems amazing to be typing last year already!!

I took this photo last year (2008 lol) while on a holiday in Melbourne. Its local scrub around Daylesford and I just loved the hugeness of it. I think the quote that I wrote pretty much covers how I felt at the time, standing there in that huge openness!!
Another Daylesford photo - I loved the idea of cutting up these papers, I handcut the flower stems to add to the pages design.
If you didnt already know, I love handcutting and especially handcutting freestyle!! I cut these circles all freestyle which is why their shape isnt uniform. The beauty of this months papers is that they are all double sided so the middle circles could be turned over to add a different pattern alternately.
Finally, I made this card with some of the scraps. The image was hand stamped using an image from a UK collection called High Hopes and was coloured with Copic Markers.

January 21, 2009

Saturday 31st January 2009


This year we have because of demand a regular card class on the last Saturday of every month. Here is our first one - just a sneak peek. Class cost is $20.00 and you will make 10 cards (all samples are available for viewing at the shop)Time is 1.00pm. Please call to book. 9749 1006.

Wednesday 28th January 2009


Using Die Cuts with a View cardstock, we will creat this stunning double page layout. Techniques:- Cuttlebug - Dry Embossing, paper cutting and inking. Class is $15.00 Time: 7.30pm. Photo's required 1 x 5" x 7" and 2 4" x 6" Vertical orientation Please call to book a seat - 9749 1006. Sample of layout is available for viewing at the shop.

January 16, 2009

Well here is another article already!! I recently came across the idea of adding a layer of vaseline between paint layers to make it more efficient when peeling layers to create a weathered look. I have no idea who originally came up with the idea and only read about the idea on a forum but was quite willing to give the concept a go anyway so if it is your idor you have seen this done somewhere I would love to here about different ways of doing this technique!!


You need -


  • At least 2 colours of acrylic paint (I used red, silver and burnt sienna)


  • Vasolene


  • crackle medium


Step 1 :Begin by adding paint to a piece of cardstock and coating the piece entirely.


One


Step 2 : Once the paint is thoroughly dry, smear a layer of vasolene roughly over the surface of the paint. Don't be too careful as you want to have area's that have very little or no vasolene on them for a better effect.


Two


Step 3 : Next, paint a layer of paint over the top of the vsolene. Be careful not to overwork the paint as you will only succeed in blending the paint and vasolene together and creating a mess!!


Three


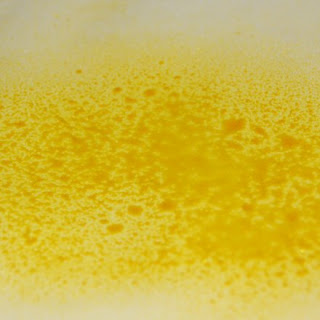
Step 4: Leave to thoroughly dry. As the paint dries you may notice the paint crack over the thicker sections of vasolene, don;t worry this is normal!! Once dry, grab an old chux and begin rubbing at the paint.


Four


Step 5 : As you rub you will notice that the area's where the vasolene was thicker, the paint comes off completely while the area's where there was no vasolene, the paint remains in place. Continue rubbing over the surface until you like the effect them gently wipe off any excess vasolene.


Five


And thats the technique. Of course me being me I wasn't happy to just leave it there, I wanted to do more to it to get a much more rustic effect!! Here's what I then did -


Step 6 : Add a layer of crackle medium and leave to dry. Mix a third colour of paint with water (about half and half of each) then paint over the crackle medium with this watered down paint. The watered down paint seems to create a much deeper crackle effect which I prefer.


Six


So what can I do with it? Well, I chose to use it as a photo Matt for one of my scrapbooking pages but I reckon its also a backround that I would use for male cards or even to punch out shapes from!! Here's a scan of the page I created with this piece -


Example


Blog_signature_image_4

Storing Leftover Pattern Paper and Cardstock

Since the New Year, how many of us have been busy 'decluttering'? I know I have been and I must say that I've been really pleased with how much 'clutter' I have removed from our home! My large linen cupboard has so much more room now, so much so that I'm moving the scrapping supplies I had in our study, into there!

One of the tasks I've been working on recently has been sorting through all my leftover pattern paper and cardstock and putting it into a new storage system!


I used to store all my scraps - 12 x 12 zip lock bags and as you can see, some of them were stuffed quite full - especially the blue, brown and green bags which are colours I tend to use quite a lot! I also had a bag for yellow, orange, red/pink, purple, black, white and gold/silver. So, 10 bags in total and as you can imagine, they were not to easy to store, let along trying to find something in them that might be suitable to use! Totally, NOT inspiring!

I still wanted a system that I could store my leftover pattern paper and cardstock by colour BUT it needed to be easier to store on my shelves AND be condensed in quantity a great deal too!!

So, I tipped out each bag and sorted through all the pieces, firstly keeping all those pattern papers and cardstock pieces that I knew I could use again, either on cards or pages. Then I went through and took out all the pieces that I thought the boys might be able to use and added them to their paper box. The rest? Well, it went into the circular file as they say - the recycling bin! Yes, it may have been a bit ruthless BUT at least I know I have kept pieces that will be used! You'd be surprised how old AND small some of those leftover pieces were!!

So - what have I done with the all the pieces I intend to keep - and more importanly - use?!

Well - I picked up these functional clear storage wallets in Safeway, which are just perfect because they stack relatively flat because of the simple, but effective, slit closure!


So - I still have a few bags to sort through, which is on my 'To Do List' for later today, but at least I know that I will indeed be able to use all the pieces that are in these wallets! Before it was just a pain to work out how and where to store all those 12 x 12 zip lock bags - these new ones just stack perfectly on my shelf and being clear, I can easily see which colour I want to use!


I'm going to set myself a mini goal though - I need to start using up more of my blue, brown and green leftover pattern paper and cardstock - even after all the sorting and culling, their wallets are still bulging a little - *grin*


Until next time - have a wonderfully creative week!!

Shirley

January 11, 2009

Album Make Over by Penny

Now doesn't everyone enjoy a make-over show or two, I know I do. I created this gift Mini Album for the May Scrappit Now. Now don't think too badly of me but I couldn't seem to part with it, so I kept it for myself and created a mini album for my daughter.


I designed the album so all you needed to do was add you photos and some journaling. This is what I created as the more simplified version of my daughter's album.


Now as lovely as this looked, it just wan't enough for me. By adding a few more embellishments I think I have created a keepsake worthy of years to come. Don't you think?


Till next week....keep scrapping.
Penny

January 7, 2009

Wednesday Night Class


Wednesday Night 14th January 2009
Our first class for 2009 is a stunning double layout using Bo Bunny double sided cardstock.Class cost is $15.00 Class starts at 7.30pm and bookings are essential.
Main photo size is 5" x 7" Horizontal orientation. Sample layout is on display at the shop.

Kids Class 2009


January 2009 Kids Scrapbooking Class
Saturday 17th January at 1.30pm. Please bring along a 5" x 7" horizontal orientation photo. Cost $10.00 Bookings essential, please call 9749 1006 to ensure a place.

January 6, 2009

'Oh What Fun' Scrappitpack

Have you taken a peak at the January Scrappitpacks? They're just stunning and I love how Jan, Penny and Sharon have used the other 3 packs! (Just click on each pack individually to see an example of how the pack has been used)

I used the 'Oh What Fun' Scrappitpack to make this 'Christmas Recipe Book' and my first Christmas card for later this year too!


Don't forget to share your creations in the Scrappit Gallery - we'd love to see your work!

Until next time,

Shirley

January 4, 2009

Happy New Year

Hi everyone,
Just wanted to drop by and wish everyone a very Happy New Year.
Cheers
Jan @ the team at Scrappit

January 2, 2009

Shimmery Backgrounds


I love the chance to get out the messy stuff and play around till a page works its way out of that mess!! I also love playing with a wide variety of mediums and have yet to find something that will scare me off of having a go.


One of my favourite get messy products is good old Selleys Pollyfilla. It’s available in all hardware stores and some discount stores and is a wonderful medium for adding texture to a page.
To create this page I began with a simple piece of white cardstock that I coated roughly in pollyfilla from the centre out to one of the corners. While it was still wet I pressed a damp chux cloth into its surface to add additional texture before stamping into the thicker sections with a foam swirl stamp.
Once dry, I sprayed over the surface with 2 different shades of luminescent dye. There are a great many available on the market at the moment from Radiant rain, Memory mist, Moonshadow mist and Shimmer mist. They are however, really easy to make for yourself –
1. Mix 1 teaspoon perfect pearls powder (or Pearl ex powder) to 5 t0 10 drops of reinker dye in your chosen colour.
1. Mix with water and fill a small spray bottle. The more water you add to the mix the more translucent the effect will be.
To complete my page I tore off one side and added a strip of vintage music paper, added an old book page, painted a right angle section with crackle paint and adhered my photo matt and photo. Finally I added some flowers and butterfly punchies and sprayed everything one final time with my spray.
*A good tip to note, when you want the ink to pool spray close to your project otherwise spray in quick arm motions across the page with the sprayer held at least 30cm away from your project.
Spray nozzle held away from surface
Spray nozzle kept close to surface