I've been busy scrapping and I thought it would be nice to create another article to share. I created the following page -

Required
2x White A4 sheet cardstock
Brush and container of water
Prima Daisy Dreams-Apple (Remove centre piece to use)
Bazzill Tag – White Making Memories Noteworthy Die Cut Paper – Scalloped Dot
Build a Swirl Acrylic Stamps – Scratchy & Wordy
Inkadoo Acrylic Stamp set – Sketchy Flourishes
Tim Holtz Idea-Ology Mini Paper clips
Tim Holtz Idea-Ology Keyholes
Tim Holtz Idea-Ology Hitch Fasteners
Tim Holtz Idea-Ology Grungeboard Elements – Harlequin
Prima Heirloom Paper Leaves – Sage
Kaisercraft Silver Rhinestones
Basic Grey Kioshi Mini Mono Stickers
May Arts Scalloped Two-Tone Trim – Red
Prima Grand Dame Flowers – Jubilee
Prima Fairytale Roses – Baby Pink
Ranger Distress Inkpads – Tattered Rose, Peeled Paint & Fired Brick
Ranger Distress Crackle Paint – Peeled Paint
Instructions
Pop two of the hinges out of the grungeboard and coat with a thick layer of Distress Paint. Put aside to dry thoroughly.

Using the Peeled Paint Distress inkpad, stamp one of the Inkadoo Flourishes along the edge of the large tag. Repeat using another of the flourish stamps and the Tattered Rose Distress inkpad.

Next, stamp the Prima Scratchy swirls onto the Making Memories card along one from one corner using the Fired Brick Distress inkpad.

Stamp the Inkadoo Flourish along these flourishes using the Peeled Paint Distress inkpad.

Adhere the Bazzill tag to the opposite top corner of the base from the stamping, at an angle.

With one of the A4 white sheets of card, tear a rectangle that roughly measured 7 inches by 9 inches. Spray with water until soggy. Tap down the Fired Brick Distress inkpad around the edges to colour.

While still wet, roll the edges and dab each curl with the Fired Brick Distress inkpad to highlight the curling.

Adhere at an angle to the white tag on your page.

Stamp two of the Prima Wordy swirls with the Peeled paint Distress inkpad onto a sheet of A4 white card.
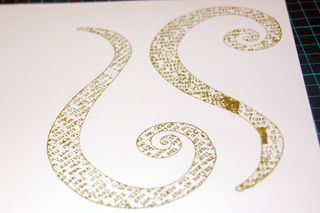
Spritz the swirls with water until the ink begins to run.

Use a paint brush and additional water, paint in additional colour from the Peeled Paint and Fired Brick Distress inkpads. Set aside until thoroughly dry then cut out.

Attach diamantes to each of the holes on the hinges and attach to opposite corners of the Bazzill tag.

Adhere a large flower to corner over the corner of the stamped image. Attach the painted flourishes to your page, pinning them behind the flower and using foam tape to add additional dimension.
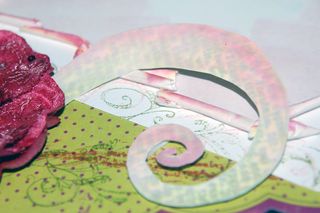
Adhere Fairy tale roses and leaves along the edges of this swirl. Add Prima daisies to the hitch clasps and tie a piece of trim to the shaft of the hitch. Add to the base of the swirl. Scatter additional Diamontes around the swirls.

Add a keyhole to the bottom right of the page.

Using the Basic Grey Alphabet monograms, add the title to the top of the photo. (I added an additional title line using type I printed on my computer and punched with a small square punch).

Finally, add a ribbon bow to one of the mini clips and attach to one corner of your photo. I then added an extra clip for additional texture.

And thats it!! Hope you've enjoyed this project!!


