Showing posts with label Design Team Inspiration. Show all posts

October 9, 2011

Cuttlebug Embossing Folder Storage

Over the years I've collected quite a few cuttlebug embossing folders and have struggled to find an efficient way to store them. I mean, I initially bought one of those bag things cuttlebug sold but I found it far too heavy and clunky and it didnt seem to store all that much considering its size and weight.


So... I decided to try out some of my pockets from Kaisercraft that I've been using to store my acrylic stamp and was ever so surprised to find that two folders fit side by side in each bag which means I coud see everything I own at a glance (with the cuttlebug system the back ones need to either be labelled or pulled out to see what they are). Heres whqt mine looks like ...


DSC_0006


I've comfortably fit 12 bags (or 24 embossing folders) into my folder and I'm pretty sure it could fit another two easily before the folder refused to sit flat.


Finally, I've decorated it all so it looks pretty on my shelf ...


DSC_0004


DSC_0005


I used the kaisercraft folder for mine and found it perfect for the job although I did find that I needed to score/sand the cover first for the glue to adhere successfully as it had a bit of a shine to it.


Sharon

October 8, 2011

Altered Twidleybitz Book

Recently I went to one of my all time favourite bands who were in concert here in Australia!! I've been listening to them for a very long time so it was amazing to see them live.

The band are a pretty amazing and very humble group who promised all their fans that they would remain afterwards to meet and sign autographs for everyone willing to wait for the chance.

Of course, I had to wait and for it I got my photo taken with the lead singer Stephen Christian who I adore even more now.

To commemorate the occasion though, I created this altered book with my signed ticket and photo inside it ...
I began by papering the entire cover with scraps of patterned paper, some of which I had rolled the edges on. Next, I added sections of Gesso then polished everything down with a ragged piece of muslin that I had dyed with drops of a ochre and brown fabric dye. I then tore that strip into pieces to form the bows on the binding rings.


Here's what the inside pages look like ...

I decided to cut a section out of the centre of one of the pages to show both sides of my ticket since the band all signed the back of it. I covered each side with a piece of acetate so that my ticket was trapped inside a protective window but unfortunately the front reacted a bit to the glue I used - I guess its just another reminder of why we should always copy everything.

Finally, here are a few close-ups of some of the details that I put on the front cover.


Sharon

June 21, 2011

Time To Say . . .

For those of you who have been customers of Scrappit for a while you might know that I've been on the Scrappit Design Team for quite some time - since January 2003 infact!

Scrappit has undergone a number of changes over the years - from new owners, to new Design Team Members BUT I personally have loved each & every moment of being a member!  At the time I joined the team I was a Stay-At-Home Mum and aside from the duties that go along with that, I lived & breathed scrapbooking.  If I wasn't actually scrapbooking, I was browsing the web looking at products OR finding ideas OR participating in forums & sharing my own ideas. My work through Scrappit gave me the confidence to submit and be published in a wide range of papercrafting magazines over the years and I even spent 6 months on a Design Team for one of them too.  To say that I lived and breathed scrapbooking was probably an understatement - *grin* 

With time though, comes change and one of the major changes in my life has been the fact that I've gone back into the workforce this year in my professional role as a Kindergarten Teacher.  It's only 1 day a week but as everyone who is in a teaching role knows, you end up putting in more hours into the job than what you get paid for.  Ontop of this, I also listed myself for relief teaching - something which I've been doing a lot of since we returned from our recent 5 week holiday to Tasmania!  As you can imagine  I'm spending much of my so called 'free time' getting things organised at home before the next day/week rolls around.   There just doesn't seem to be enough hours in the day!  Not surprisingly, at the moment my crafting supplies tend to spend much of the week sitting idle.
 
So, this comes to the point of this post and you've probably guessed where I'm heading with this anyway . . . this isn't a decision I have taken lightly - Scrappit has been such a big part of my life for the past 8 years BUT the time has come for me to say goodbye and resign as a member of the Scrappit Design Team.

I would like to thank everyone at Scrappit for their friendship, support, encouragement & inspiration over the years . . . I hope that I am able to continue the many friendships that I have developed with so many of you into the future!

For those who may be interested, I will be continuing to blog - yes I know it's a little out of date at the moment BUT I will get back to it and share some of my life and my creativity a little more regularly . . . I'd love for you to stop by and keep in touch - http://shirleyfyfe.typepad.com/

So, before I sign off on my last Scrappit Design Team Blog post, I would like to take the opportunity to share one last papercrafting creation with you . . .

This particular card has been adapted from one that my dear friend Jan showed my local crafting group how to do.


The background features an embossed image that has been heavily inked with Tim Holtz Distress Inks and then mounted onto a black greeting card.  I had thought about adding a hand stitched - yep, you know what I'm like with my hand stitching  - LOL - but I decided to just leave it as it was - I think you call that restraint don't you?  LOL


The butterflies have been triple punched and mounted on top of one another - I can't take credit for the idea, but I do love the layering effect!


I decided to lightly ink each of the layers to give them a somewhat rustic feel to tie them into the background, before each butterfly was finished off with a little bling strip down the centre of the body.

Simple ideas but I think they work well together!

Well - there you have it . . . my very last post on the Scrappit Blog!

Thank-you everyone for your friendship and inspiration . . . and to Paula & the Scrappit Design Team - I wish you every success into the future . . .

Shirley


May 9, 2011

Motivational Monday

Well - here we are at another Monday - I don't know if it's just me OR do you find that they seem to come around so very quickly too?  No sooner does one week begin then another is just around the corner!

I recently set about prioritising a number of unfinished papercrafting projects that I have sitting around and that I'd like to get completed - let me assure you that there are quite a few of them!  I'm not sure why I didn't finish them at the time BUT none-the-less, I can finally say that I have finished this one!


This page is one for my 'Macro Album' - an album which focusses on a large selection of macro photos that I thoroughly enjoy capturing.  I particularly love the detail that has been captured in this bee and the pollen on the flower - apologies for the indifferent colour - the colours are a little more harmonious in real life!


I've actually printed the photo of the bee twice - once in a 4 x 6 size and again in a 5 x 7 size.  I then simply added some double-sided tape to the reverse of the smaller image and adhered it over the larger one to create some added dimension and size to the overall image.

So - what have you been up to with your Papercrafting?  Do you have unfinished projects that you need to get completed too?  I'd love to hear what projects you have stashed away and that still need completing!  I'll be back next week to share another of the projects that is on my To Do List and that I have promised myself that I WILL get completed!

Have a great week!

Shirley
Scrappit Design Team Member

April 22, 2011

Easter Gift Giving

Here's a quick Easter Gift Giving idea!


Take a half 12 x 12 sheet of double-sided pattern paper and score a line horizontally through the centre.  Also score 4 diagonal lines to create two triangles - please see the diagram below.  Punch small holes in the four corners.


I find it easiest to decorate the front triangle before going any further, although you may like to leave this step to do once you have filled and tied your Gift Box.

Fold in half & tuck the sides of the box inwards - hold gently and fill with your chosen chocolate or confectionary - don't overfill though!  Thread through a co-ordinating ribbon and tie to enclose your goodies!


So very simple BUT so versatile because you can make them any size you like!

Happy Easter!

Shirley
Scrappit Design Team Member

August 1, 2010

July Scrappit Now Pack

I thought I'd share another layout I created from the July Scrappit Now Kit. I literally used up all the left overs from the kit to create this layout.

The edges of the papers and cardstock where distressed and inked in a vintage colour then machine sewn to the background cardstock.


By overlapping cut-out pieces of the flower die-cut paper I created depth with the flower. I then placed another flower in the centre

The chipboard tags were taped together and painted in a similar colour to the flower die-cut paper. When they dried I attached them to my layout and used them as a backdrop for my title.

I also wet and scrunched the lower paper then inked over the creased edges to give an aged feel.


July 23, 2010

Recycled Packaging - A Gift Box

Do you ever look at the packaging on some items and think of another use for it?  I do it all the time and have things stashed away for a later use.

One of those items was this Blossom box that had some gorgeous Hibiscus Flowers in it.


I simply cut down the clear plastic on the inside and then decorated the outside with some of the gorgeous products in this month's 'ScrappIt Now' Kit!


Don't you just love Melissa Frances products - there is such a beautiful range in this month's 'ScrappIt Now' Kit - be quick though - I did here that there were only a limited number of these kits left!

Oh - and if you are interested in seeing what Penny & I have created with this month's kit and finding lots of step-by-step projects - make sure you download your copy of the 'July ScrappIt Now Newsletter'.

June 19, 2010

100 Creativity Starters

Unfortunately I missed last weeks challenge for the weekly newsletter and thought I'd share my version with you here.

Our challenge was to glitter the edges of an accent. If you look closely you can see I've added a touch of stickles to the edges of some of the flowers surrounding my photo. I'm not a huge fan of glitter, as it seems to find it's way into everything and stays around from here to my next birthday, but with the glitter glue you are able to contain where and how much glitter is added to your projects. Perhaps it's worth a try next time you think of adding that little extra sparkle to your pages.


May 4, 2010

3D Greeting Card

A couple of weeks ago one of the ladies in the local social scrapbooking group I run showed us this gorgeous greeting card that I couldn't resist having a go at making myself.

I used two blank white cards to construct the card and then used up some pattern paper scraps for decorating it!


Whilst this may look like an ordinary greeting card on the outside, the inside is just a little different . . .


Here's a view from the top!


And a view from the side as well . . . cute isn't it?


I must extend a big thank-you to 'Sandy' for showing us this card . . . I can see that this is going to be one card that I enjoy making time and time again!

Until next time,

Shirley

April 19, 2010

100 Creativity Starters

Unfortunately I missed the challenge last week and really wanted to see what I could come up with.

Last weeks challenge was to 'close your eyes and reach your hand into a drawer of supplies'. Well, this is a bit hard for me when I have a whole room full of drawers but here's what I picked.

Old scrap paper, ribbon and old chipboard letters. I've had these whale watching photos since last August and promised myself to have them on a layout this year. We were in Hervey Bay for the whale season and I loved every minute of it. Highly recommend to anyone to hasn't done this before.

I'm really into this doodling on my layouts at the moment and this truly gave me another opportunity to play.


ps: Sorry about the quality of the pictures, my scanner isn't in the mood to play at the moment.


April 13, 2010

No Less than Extra-Ordinary Scrap Page

I've been busy scrapping and I thought it would be nice to create another article to share. I created the following page -


SJ-MAY-Project-1


Required


2x White A4 sheet cardstock


Brush and container of water


Prima Daisy Dreams-Apple (Remove centre piece to use)


Bazzill Tag – White Making Memories Noteworthy Die Cut Paper – Scalloped Dot


Build a Swirl Acrylic Stamps – Scratchy & Wordy


Inkadoo Acrylic Stamp set – Sketchy Flourishes


Tim Holtz Idea-Ology Mini Paper clips


Tim Holtz Idea-Ology Keyholes


Tim Holtz Idea-Ology Hitch Fasteners


Tim Holtz Idea-Ology Grungeboard Elements – Harlequin


Prima Heirloom Paper Leaves – Sage


Kaisercraft Silver Rhinestones


Basic Grey Kioshi Mini Mono Stickers


May Arts Scalloped Two-Tone Trim – Red


Prima Grand Dame Flowers – Jubilee


Prima Fairytale Roses – Baby Pink


Ranger Distress Inkpads – Tattered Rose, Peeled Paint & Fired Brick


Ranger Distress Crackle Paint – Peeled Paint


Instructions


Pop two of the hinges out of the grungeboard and coat with a thick layer of Distress Paint. Put aside to dry thoroughly.


SJ-MAY-Project-1-1


Using the Peeled Paint Distress inkpad, stamp one of the Inkadoo Flourishes along the edge of the large tag. Repeat using another of the flourish stamps and the Tattered Rose Distress inkpad.


SJ-MAY-Project-1-2


Next, stamp the Prima Scratchy swirls onto the Making Memories card along one from one corner using the Fired Brick Distress inkpad.


SJ-MAY-Project-1-3


Stamp the Inkadoo Flourish along these flourishes using the Peeled Paint Distress inkpad.


SJ-MAY-Project-1-4


Adhere the Bazzill tag to the opposite top corner of the base from the stamping, at an angle.


SJ-MAY-Project-1-5


With one of the A4 white sheets of card, tear a rectangle that roughly measured 7 inches by 9 inches. Spray with water until soggy. Tap down the Fired Brick Distress inkpad around the edges to colour.


SJ-MAY-Project-1-6


While still wet, roll the edges and dab each curl with the Fired Brick Distress inkpad to highlight the curling.


SJ-MAY-Project-1-7


Adhere at an angle to the white tag on your page.


SJ-MAY-Project-1-8


Stamp two of the Prima Wordy swirls with the Peeled paint Distress inkpad onto a sheet of A4 white card.
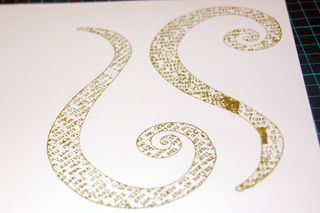

SJ-MAY-Project-1-9


Spritz the swirls with water until the ink begins to run.


SJ-MAY-Project-1-10


Use a paint brush and additional water, paint in additional colour from the Peeled Paint and Fired Brick Distress inkpads. Set aside until thoroughly dry then cut out.


SJ-MAY-Project-1-11


Attach diamantes to each of the holes on the hinges and attach to opposite corners of the Bazzill tag.


SJ-MAY-Project-1-12


Adhere a large flower to corner over the corner of the stamped image. Attach the painted flourishes to your page, pinning them behind the flower and using foam tape to add additional dimension.
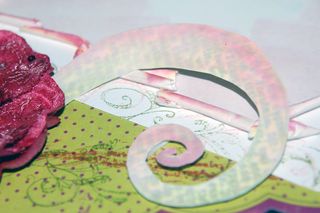

SJ-MAY-Project-1-13


Adhere Fairy tale roses and leaves along the edges of this swirl. Add Prima daisies to the hitch clasps and tie a piece of trim to the shaft of the hitch. Add to the base of the swirl. Scatter additional Diamontes around the swirls.


SJ-MAY-Project-1-14


Add a keyhole to the bottom right of the page.


SJ-MAY-Project-1-15


Using the Basic Grey Alphabet monograms, add the title to the top of the photo. (I added an additional title line using type I printed on my computer and punched with a small square punch).


SJ-MAY-Project-1-16


Finally, add a ribbon bow to one of the mini clips and attach to one corner of your photo. I then added an extra clip for additional texture.


SJ-MAY-Project-1-17


And thats it!! Hope you've enjoyed this project!!