September 27, 2008

Buzz and Bloom Mini Tokens

Have you seen these gorgeous little Mini Tokens by 'Buzz and Bloom'?


Each token measures 4cm in diameter and Scrappit has 4 fantastic themes in stock:
  • Pirates
  • Fairy Tale
  • Dump Truck
  • Butterfly Kisses

Whilst you're checking these out, why not also take a peak at some of the other Buzz and Bloom Chipboard Embellishments - like the 12 x 12 'Party Time' Overlay, the 'Wiggly Worm Pointers' OR the 'Up the garden path' line of flowersI So cute!

I can see I need to add a few things to my wish list at Scrappit!

September 26, 2008

Scrappit Kits

Hello everyone, hopefully you've had a great week and planning an even better weekend.

I thought this week I might share a recent find on the Scrappit website. As you know I have been with the DT for a few months now and contribute to their monthly Club and Scrappit kits. For some reason I never thought to go back to review kits that weren't asigned to me or prior to my joining the Design Team. To my surprise I ordered the August 2008 kit that Sharon Jeffs designed for and decided to be inspired by the lovely colours and patterns in this pack.

Jan has developed a keen eye when it comes to selecting Packs for her scrappers. They contain enough card and paper plus embellishments to complete more than a single layout.

Next time you're browsing the Scrappit website don't hesitate to look at previous packs to see what's available. You might be pleasantly surprised like I was.

Till next week - be good and keep scrapping....Penny

Storage Ideas

I don't know about you but I am forever searching for the best idea's to maximise my ability to see what I have to use while still saving my room from looking overcrowded. I hate the idea of of putting things away in a little box where I know I will forget them!!
I found this idea on one of my blog hopping jaunts months ago -

The system comes from Ikea and cost less than $20 to provide you with innovative storage, mine has been attached to the side of my working desk. The best part of course is that everything is sold separately so you can mix and match to suit your own needs . For me, I needed the long shallow basket to hold all my ribbon rolls while the tall thin one was perfect for storing all my most used tools like scissors and craft knives.
The best part of this system is that the rack itself can be used to store those much used punches.
Another storage idea is the clip it up -


It is a great place to hang all those packs of unmounted stamps for quick and easy reference.
So do you have any unique and different idea's for storing your goodies?


September 19, 2008

Ephemera or Collage Projects by Penny Ash

Week 3 and my final instalment on Ephemera or Collage projects by Penny Ash.

Journals are a great option to extend your Ephemera or Collage style. Pre bought journals from you local supermarket are an inexpensive and readily available option. I have made the larger journal as a Christmas gift for my daughter's teacher.

  • Step 1. Select a colour of your journal to suit your project. Mine have a sepia recycled look to them.
  • Step 2. If your book has a glossy or smooth cover you will need to use Stazon ink to stamp your images. I’ve used a selection of clocks, circles and old English writing on my covers. Rubons could also be used, as on my larger journal.
  • Step 3. Now the fun part – adhere all those bits and pieces from your stash. Paper flowers, clips, beads, ribbon, chain, clock parts, typewriter buttons, stickers, stamps and gems are some of the items on my books.
  • Step 4. To seal the cover I used a combination of Glossy Ascents and Mod Podge.


This concludes my three part series on Ephemera or Collage projects. So what have you learned from my ideas? Hopefully you’ve realised there is no right or wrong way to use these products. Placement isn’t everything and just have fun using your bits and pieces. It’s your turn now so take a chance and start ‘Plonking’ those pieces down.

I know Jan and I would love to see what you have created so feel free to upload your creations in the Scrappit Gallery. I look forward to hearing any feedback you may have and I’m sure the Scrappit Design Team can assist you with any queries you may have.
Remember to enjoy doing your projects and test the waters with a creation 'outside the box'.

Wednesday Class


Wednesday 1st October Class. Time: 7.30pm. Cost: $15.00. We are working with those scrummy textured Black Market Paper Company papers, makng your own Journal Box and accents from supplied paper, paper layering, inking and using the Sizzix machine. You will need 1 - 5" x 7" landscape and 2 - 4" x 6" photos to complete this layout. Be quick as seats are filling fast ring to book 9749 1006.

September 15, 2008

Prima Marketing - Artful Collage Blossoms

Do you ever get the feeling that the weeks just pass by too quickly? I know I do - often very frequently infact! I know I missed sharing this on 'Design Team Inspiration Day' last Friday BUT I didn't think you'd mind if I shared it today instead!

When Jan announced that Scrappit had some of the
Prima Marketing - Artful Collage Blossoms in stock, I was so excited . . . I'd been hanging out to get some of these and of course, as soon as I received them, I was keen to get creative with them too, so I got busy and created this card!


The blossoms are of a fantastic quality and the collage image is actually on both sides, so you can choose which side you'd like to have facing up!

As you can see, I decided to incorporate some beading into my card design and actually hand-sewed all the beads onto the card as well!

Here's a couple of close-up photos which show the detail a little more clearly!


So . . . if you haven't take a peak at the Prima Marketing - Artful Collage Blossoms why not take a peak at the range Scrappit has in stock today!

Until next time . . .

Shirley

September 12, 2008

Ephemera or Collage Projects by Penny

Week two in my three part series on Ephemera or Collage projects:

Microscope Slides
Yes they are the old slides you used to use back in high school but now you can really have some fun with them.

Slides can be treated in the same way as dominos. Please be careful of the sides of the slides as they can be quite sharp.
  • Step 1. Stamp an image on one slide with Stazon ink as this product is best suited for glossy/smooth surfaces.
  • Step 2. Using a small amount of Glossy Ascents GA adhere a small piece of tissue paper on a second slide. Sandwich the slides together by wrapping a strip of copper foil tape around the slides and bending over the sides.
  • Step 3. Thread some small beads and a charm on a length of wire. Wrap around the slide.
  • Step 4. Place a small amount of Dimensional Magic or GA in the top left and bottom right of the slide. Poor micro beads over the GA. Drop a small amount of GA behind the charm to secure in place.

Other suggestions:

  • Poor GA over the back of a slide. Place a piece of patterned paper or tissue paper over the GA right side down. I like to place a heavy object like a can of tomatoes over this overnight to help it set. Next morning try to strip a second layer off the paper leaving a semi transparent image. Wrap a ribbon around and tie in a bow.
  • Run the sides of a slide over plain Versamark. Dip in gold embossing powder. Heat to set and be careful as the slide will heat also.
  • Place a small strip of coins over the slide. Use GA to set.

Next week – Journal books

Coloured Pencils and Odourless Solvent cards

Hi Everyone,

I'm sharon and I am dying to show you a really cool technique for colouring in stamps that I recently learnt!! Here it is...


You will need -

  • Colour Pencils (I prefer Prisma)

  • Odourless Solvent (Available from Art supply stores)

  • Paper stubs

Directions -

To begin with, stamp your image using a dye based ink pad and leave to dry thoroughly. Using the colour pencils, colour in your image. Shade the image as you go for greater affect. You may also like to colour certain areas with more than one colour to get a deeper effect.

Starting with the lightest colours first, dip a paper stub into the solvent and colour over your image with it. You will notice that the pencil lead seems to melt as it blends.

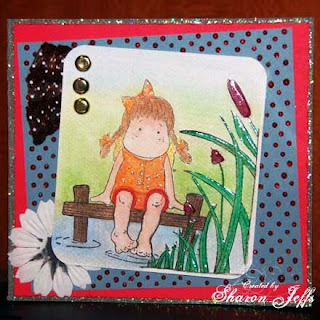
Colour in the background lightly then again using the paper stub to blend the colours together to create a watercolour effect. Finally add some glitter to small sections and/or dimensional magic to highlight certain areas such as the rushes.

Pretty isn't it?!?


September 11, 2008

Wednesday 17th September


Wednesday 17th September: 7.30pm. Cost $15.00. Bookings Essential. This stunning layout is created using Die Cuts with a View's Blossom and Butterfly cardstock, techniques included - inking and journalling. Class is filling so please call to book a seat. 9749 1006.


September 9, 2008

*FREE* Subscription!


Here's an opportunity too good to miss out on!

Creative Living Media is on a mission to encourage as many people back to craft as possible. Their magazines are full of inspiring projects, articles and fun things to create.

For a limted time they are offering a completely *FREE* subscription to their range of craft magazines (usually valued at $29.95). How fantastic is that!

Just click on the link above to start your *free* subscription TODAY!

September 4, 2008

Ephemera or Collage Projects by Penny Ash

I’ve created a few of these designs over the years and just love the ability of literally ‘plonking down’ items on your project. Good dimensional products like ‘Glossy Ascents’ or ‘Dimensional Magic’ is a must.

Over the next three weeks I will show you a few ideas to best showcase your projects and a few techniques to get you on your way.

This week we’ll have a look at Dominos. I’ve used a few wooden ones my children have outgrown for these projects.


Step 1. Place 3 Dominos closely together. You can place some tape on the bottom to hold them temporarily if you like.

Step 2. Select a few general background stamps such as music sheets, scrolls, old English writing etc. Stamp these across all three tiles in different colours with a good dye ink as they will bleed into the porous wood product.

Step 3. Working with one Domino at a time, cut a strip of copper adhesive tape and run this around the outer edge of the tile.

Step 4. Now’s the time to raid your ‘Bits & Pieces’ stash. Products like micro beads, magic mesh, chain, mirror tiles, pebbles/stones, charms, keys, watch parts are a good selection to use.

Step 5. Again, working with one tile at a time, poor Glossy Ascents GA onto one third of your tile. Drop or place pieces of your ‘stash’ into the dimensional product. Continue until the tile is complete. I find GA is a thicker product and doesn’t run off your project. If required fill spots with more GA until you are satisfied with the look.

Step 6. Leave your tiles to dry/set overnight before using on your extended projects. Small air bubbles may appear. These can be popped with a pin if desired.


Next week – Microscope slides

FRIDAY will be Design Team Inspiration Day

From now on . . .

FRIDAY is going to be Design Team Inspiration Day!

Make sure you check in throughout the course of the day to see what members of our Design Team have been up to!

They might share their latest creation, a great new product they have found and tried from Scrappit or maybe even a technique or two!

Stay tuned!