November 30, 2009

Scrap Day Dec 5th 2009


Saturday Class
Best Creations cardstock is embossed and highlighted with Glitter. a real Girlie layout. Don't forget if you haven't yet booked a place either call Jan - 0400 364 320 or Paula 0414 830 094 to ensure a seat.

November 23, 2009

Give some stitching a go.

If you’re like me you just love to stitch on a layout. Whether it’s by hand or machine, some layouts just don’t look complete without that but of stitching. In my layout Happy Go Lucky I used pattered paper as my template. By layering a piece of acetate over your paper and using an awl, pierce these together. You’ll then be left with a clear template you will be able to place over any design to see where you are going.

This technique is great to use on plain cardstock and by using different coloured thread for the layers gives the design more depth.

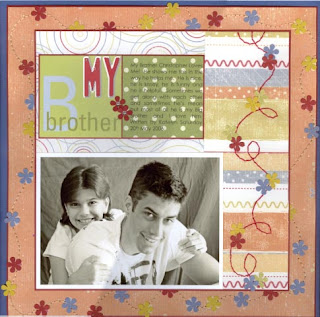
On my layout My Brother I have used thread to create a trail between the flower brads. On my Back to Nature page I have complimented the patterned paper squares with brown machine stitching. This balances the simple block design and border.


So next time you’re looking to add ‘that something else’ to a layout consider a bit of stitching. Although I don’t embroider and sew my own clothes anymore at least I feel I’m still contributing with my ‘Paper’ stitching.


November 18, 2009

November 'ScrappIt Now' Newsletter

The November 'ScrappIt Now' Newsletter has been released - it's filled with wonderful creative ideas from Design Team Members - Sharon Jeffs & Shirley Fyfe.


Make sure you head on over to Scrappit to download your copy today!

Digital Christmas Freebie

Since Santa officially touched down in my hometown last weekend, I decided to create a set of Christmas brushes. I've also made the files as PNG's as well with the original colouring that I had intended each brush to be. The PNG's are ready to use as is and would make a great addition to a digital Photo card.
Here is a preview of the brushes in their PNG form -


To download the set follow this link here. (File is approximately 2.6MB)

November 11, 2009

Blossoms

Don't you just love blossoms?  They come in such a wide variety of colours, shapes and sizes don't they?  I know I love using them and I have to say that these 'Green Tara' ones from Scrappit are just gorgeous!  I do so love the colours!


The scrolly outside border is one I created myself and hand-stitched in Aqua embroidery thread - yeah - a little on the time consuming time but I do so love the result.  To compliment the overall colourscheme, I also lightly inked the outside edges of the background cardstock AND then added some swipes of Aqua acrylic paint as well!

Here's a couple of close-up photos that show a little more of the detail!


The butterflies were actually pre-printed transparency images, which I cut out and then sewed onto my page.  I have replicated the same idea myself by saving clipart images and printing these onto transparency sheets as well - they work just as effectively and I love how the butterflies look as though they are about to fly off my projects!


Here's hoping you are having a wonderful day and I do look forward to sharing again with you soon!

November 4, 2009

Card Class for Nov 7th


Hi Everyone
A little sneak peek at the card class for Saturday the 7th November - card classes are $10.00 all materials provided.

November 2, 2009

Crop Day Classes - 7th November 2009


Hi Everyone
Here are the classes available for our next Crop Day on Saturday the 7th. Don't forget there will be card classes (Christmas themes) available as well as ongoing Opal demonstration during the day. There are 3 double layouts available, however numbers for each class are limited. Scroll down to see all classes. So hurry book your seat as we are filling fast and you don't want to miss out on the jam packed day. Tel: Jan 0400 364 320 or Paula 0414 830 094

Crop Day Classes


Saturday 7th November 2009


Christmas Gift Bags

I don't know about you but I really can't believe we're in November and Christmas is just around the corner. This prompted me to have a little gift ready for my Daughter's teacher and what better way to present the gift than in a self decorated shopping bag.

You can pick these up from any craft store and with a few embellishments you have just the right look you're after.


Measure the front of the shopping bag and trim patterned paper to fit. I have overlapped the top and bottom of the paper with a solid colour and scalloped the edges. A light swipe of ink will compliment the look.


Tie a couple of pieces of thin ribbon around the lower edge of the paper. Create a Christmas tree using a triangle of paper and matting this on cardstock. Trim a piece of cardstock for the base of the tree and raise with pop dots before attaching to the front of the bag. Strips of paper can look like tinsel if placed on an angle around the tree. To finish add a star brad at the top of the tree and make a small name tag and attach to the handle.

For this example I cut a small window from the bag and placed some acetate over (this will stop your contents from escaping). Measure a piece of patterned paper the size of the bag and run a row of machine stitching around the outer edge. Cut a window from this, slightly smaller than the window on the bag and using a die cut frame, place this over the top to hide your edges.

After adhering to the bag, embellish with Christmas baubles cut from the paper, star brads, metal tags and chipboard alphas. To complete I wrapped a thin piece of ribbon around the handle and secured with tape on the inside of the bag.


Hopefully this will encourage you to add that little extra sparkle to your gifts this Christmas.