October 31, 2008

October Club Scrappit - 3 Quick Cards by Penny

I love making cards from my left over paper and cardstock. Here I’ve created one card from rubons and added a jewel brad for a bit of bling and the other two cards were created using a wallet sized photo of my friend’s puppy.

Each card has the same basic steps which are:

1. Trim your cardstock to A5 or 21x14.5cm. Score and fold using a bone scorer. If you don’t have a bone scorer use a stylus for scoring and your fingernail to neaten your crease.
2. Cut a piece of coordinating cardstock 10x14cm. Trim a piece of patterned paper 9.5x13.5cm. Place a small piece of double sided tape on the back of the patterned paper to adhere to the cardstock. Machine stitch around the outer edge of the patterned paper. Secure the threads to the back and adhere this block to your card.
3. A) Photo cards: Mat your black and white photos on black cardstock and adhere to the front of the paper. Add rubons of your choice. Ink and emboss chipboard flowers. Cool then attach to the card front.


4. B) Rubon card: place your butterfly rubon on white cardstock. Add rubon word, butterfly trail from trimmed flourish and a corner as shown. Colour the butterfly rubon and flourish using permanent markers. Add a jewel to the centre of the butterfly as his body. Mat on black cardstock and adhere to your card.


Till next week - happy scrapping

Penny

Glad Wrap Effect Cards

Everyone who knows me knows just how much I love playing with mixed media techniques, especially working with paints!! I recently found this idea while blog hopping and just had to have a play, I've since changed the technique to suit my own personal style and wanted to share it with you. Here's my completed card -


Requirements –

* Acrylic paint, a light and a dark shade and silver.
* Glad Wrap
* Scrap of sequin scrap

1. Cut card to size and coat evenly with your darkest colour. Leave to dry thoroughly.


2. Squirt some of the lighter shade onto your painted piece of card. Don’t worry about being precise and exact as the paint will be moved around with the Glad Wrap.

3. Tear of a piece of Glad Wrap large enough to cover the surface of your card piece and the edges by approximately 5 cm.


4. Scrunch the Glad Wrap onto the surface of the card. At this point any excess paint will gather into the folds of the Glad wrap. Leave to dry thoroughly.


5. Once dry, carefully remove the Glad Wrap. At this stage you will notice that where the paint fell into the folds of the Glad Wrap, the paint is thinner or absent.

6. Using the Sequin scrap and a balled up scrap of Glad wrap, sponge the silver paint over the sequin scrap to create a random patterning.


7. Allow the whole piece to dry thoroughly and then attach your embellishments to finish off your card. I chose to colour in a few stamped images then attached with dimensional foam tape. To create the white area for the stamped image I simply ran a Dry Whiteout tape.

October 27, 2008

Saturday November 22nd at 12.30pm


Create this gorgeous Advent calendar using Karen Foster papers and embellishments. All product supplied class cost $30.00. Approximately a 2 hour class. Bookings a must.

October 24, 2008

Updating Outdated Layouts by Penny

I suppose everyone has at least one layout that they created either when you first started scrapbooking or even recently that you look at and go OMG what was I thinking? Today I was looking through DS#2 album and was struck by an ungodly LO I created some 5yrs ago. I remember it clearly. I had just purchased one of those hand held squeeze punches and went absolutely wild creating a bright blue border for his baby photo. Well, I don't know whether I thought it looked good or not but I simply couldn't give him this album with this horrible LO to showcase his baby photos.

Now don't get me wrong, I'm not one to go back and 're-do' layouts. I believe it is all in the process of learning and growing with this fabulous craft that you keep those pages as they are as a reflection of your taste and style. But, there was no way this one was going to stay as is.


There was no way I was going to show you the full 2 page spread but I did grab this page back out of the bin to scan to give you some idea of what I was explaining to you.....ghastly, isn't it!


Now for the change...........


Much better don't you think.....


Till next week
Penny

October CLUB Scrappit - Greeting Cards

Have you taken a peak at the October CLUB Scrappit Newsletter - it is certainly one very gorgeous collection this month and I really have had a wonderful time getting creative with it all!

I thought I would share a couple of my cards that didn't end up making it into the newsletter!

The first one features a punched border along one side of the blue pattern paper and then some of the foil pattern paper that I cut into strips and made them into candles! The flames were cut from pattern paper, hand stitched and then had a tear drop bling brad added to the centre before then mounting everything onto a plain white card.

Here's a little close-up of the candle tops too!

The second card was created in a similar manner with a plain white card - except on this one I actually punched the lace border along one edge - it came out fantastic BUT I don't think I'll be doing it again for fear of breaking my punch! The card was a little on the thick size!

And here's a close-up which shoes some of the layering and the pearls that I have just loved using this month!

Have a great weekend everyone!

Shirley

Nestabilities

Nestability dies have been out now for quite some time and while I've been looking at them I've kind of felt a bit lost because I wasn't sure how to use them. How about you?


Well, I did end up getting some of them from Scrappit and are pleased to say they are really easy to use and have such a pretty and unique effect when used that I know they are going to end up being my favourite tool.


So How did I go? Well first off I chose not to buy another machine simply to use the dies. Rather I did some searching and playing and have come up with the perfect recipt for using them with my cuttlebug!!


To cut with the dies -


  1. Place plate A down first.

  2. Layer plate C on next.

  3. Place the die face up next - that is ridges side up.

  4. Layer your card over the top of the die.

  5. Place plate B over the op and feed through your machine.


Now, at this point you'd notice there actually is a bit of embossing happening. You may like to leave it at that or emboss deeper by -


  1. Place plate A down first.

  2. Layer plate B on next.

  3. place die face up again but this time with the card still in the die.

  4. texture mat and embossing board.


Now here's the tricky part, Sellbinders, the company that create nestabilities actually created a tan embossing mat and embossing board as a set but they aren't all that easy to come by. As an alternative I used a Sizzix Big Shot Silicone texture mat and impressions pad. They did exactly the same job and I was able to purchase them directly through Scrappit.
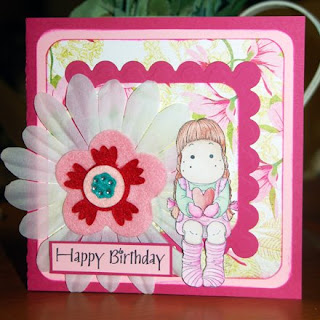
I created this card using the largest one of the scalloped square sets and layered it with several layers of patterned paper for a pretty effect. You can find this set here at Scrappit.


Blog_signature_image_4

October 21, 2008

Waste Not! by Shirley Fyfe

Sorry for the delay in posting my Design Team post - with being at Paperific last Friday and then a busy weekend, time has just gotten away from me!

I thought I would share a tip today - one in making the most of your creative stash and the products that you buy in the future!

Before you throw away those left-overs and packaging from new products, have you ever taken a peak at them and thought if there is anyway you can use them?

You might be able to use an eyelet from the top of a packet on a page or a card; some of the plastic for a tag you could stamp with Stazon; a printed strip to use as imitation ribbon; shaped cardboard as a templete and so the list goes on.

On this particular card, I've actually used a piece of left-over scalloped Bazzill as a template to create the border AND the polka dot brown strip was actually taken from the bottom of a piece of pattern paper, either side of where it said 'My Minds Eye' - waste not I say!


Have fun finding new and innovative ways to make use of some of your left-overs and packaging before you just throw them away!

Until next time,

Shirley

October 20, 2008

Wednesday 29th October 2008


Wednesday night Class 29th October at 7.30pm. We will be working with Basic Grey Ambrosia Collection, also using the fantastic Cuttlebug for embossing some of the photo mats. Photo's required 1 - 5" x 7" and 3 - 4" x 6". Class start at 7.30pm and seats are filling fast, phone to book a seat on 97491006.

October 17, 2008

Twinkling H2O Card


What do you think of this card created with Twinkling H2o's? The best part is that it is an extremely quick and easy card to create. Here's how -

  1. Stamp your image onto white card (I use watercolour paper because the colour absorbs more consistently than with normal card) using an embossing pad or a white ink.
  2. Before the ink dries, sprinkly clear embossing powder over the surface and heat set. Leave to completely cool down.
  3. Choose 2 contrasting colour H2o's. I chose to use Celestial sun and Mallard green. Begin with the lightest colour and randomly apply the colour over your stamped image. Leave to dry.
  4. Using the second colour, colour the side edges of your image and slowly blend the colour in to the centre of your first colour.
  5. Leave to dry. Trim the edges of the card however you prefer (I like to keep the white edges to show the randomness of the painting), mount and attach to the front of your card. To finish my card off, I simply attached a round bookplate to the corner and tied several strands of ribbon to the bottom arm of it.


Blog_signature_image_4


October 10, 2008

Trimming Patterned Paper for Card Projects by Penny

Hi Everyone

Well another week over and moving far too quickly to Christmas for my liking. Just thought I'd share some quick and easy cards with a bit of tearing, inking and cutting of patterned paper.


Pretty simple isn't it - just trim a few strips of patterned paper, ink the edges with a pale green ink, cut leaf patterns in two different colours from patterned paper, add some brads, rubbons or die cut stickers to finish.


Until next week........
Penny

October 3, 2008

Quick Newborn Cards by Penny

Hi Everyone

Here's a quick and easy format for making a card for a newborn boy or girl. The idea struck me when my good friend gave birth to her little boy Joshua. I didn't just want to create the usual 'birth' card but something he will cherish and look back on as a rememberance of the day he was born.


By simply writing or typing a few key points of interest eg 'Who they share their birthday with, what star sign they are born under, how much milk cost etc' you will be giving them a snapshot into the day they were born.


Until next week, enjoy your weekend and happy scrapping...
Penny

Masking Stamped Images

Ever wondered how to create a multi layered stamped image all on the one sheet of card? Well its easy and I want to share with you how to do it!!

To create a multi layer stamped image is really easy but it does take some planning. The most important thing to remember is to work backwards with the images (so to speak), so for example, the image you would normally layer on the top when layering paper is the image you stamp.

Step 1 – Choose your primary image and stamp it onto your card.
Step 2 – Stamp the same image onto a post it note and carefully cut out the image. For mine, I wanted an edge around my stamped image so I didn’t cut right on the line.
Step 3 – Layer your post it note image directly over the first stamped image. This is to protect your image when stamping other images over the top.
Step 4 – Stamp your other images directly over the top. I also chose to add colour to the tips of a stencil brush and stippled 3 different blue shades over the surface of my card.
Step 5 – Finally, remove the post it note to reveal the original stamped image. To finish off I then coloured in my tree stamp with coloured pencils and added some glitter to decorate.
October 2, 2008

Wednesday 15th October Night Class


Bookings are essential for this class Time 7.30pm. Techniques - inking and working with different textures (felt, acrylic etc). to ensure a place please call 9749 1006 BH.